
18 jun 2025
PDF forms are everywhere, from university applications and job paperwork to tax and medical documents. Luckily, we no longer have to print out these forms and complete them by hand. We’re blessed with multiple software solutions that allow us to complete, sign, and share PDF forms with ease. In this blog post, we’d like to show you how to fill out a PDF form in the easiest way possible, no matter where you are and whether you have a PC on hand.
If you’re still not using iScanner to fill out a PDF form, you are missing out. In the app, the process is as easy as it can possibly be. Everything from entering text and adding photos or vector graphics to signing and emailing your document can be done right within the app. No need for any additional software.
Here’s how to fill out a PDF in five easy steps:
Download the form you need to fill out to your smartphone and open it. Next, tap the Share button and choose the iScanner app from the list. If you don’t have the app yet, you can download it from the App Store or Google Play.
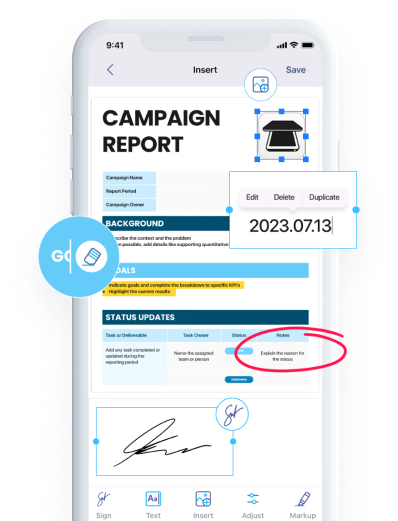
Once you’ve got your form open in iScanner, choose the Text button at the bottom of the screen. Then, tap anywhere on the screen to place the text. You can now type in the box and adjust the font, size, color, style, and alignment of the text.
What’s more, the autofill feature can do half the work for you! Whether it’s a 941 or a Parental Consent Form, your first and last name, date of birth, address, email, and phone number are the same, so why type it in each time?
To get the most out of the autofill feature, add as much frequently used information to the app as possible. Hit Text again, tap the screen, select the Autofill button to the left (it looks like a rectangle with the word ‘Auto’ inside it), and tap Plus. Now you can populate the pre-saved fields or add custom fields. So next time you tap the screen to add text, just tap the Auto button and choose the pre-added text you need.
Adding pictures or vector graphics to PDF forms has never been easier. If the form you’re filling out requires a photo, tap Image at the bottom. In the next menu, tap Photos to add one from your gallery, or Camera to take a new one. Then, tap Next and tap the screen to place the picture. If needed, tap the picture to edit it—crop, adjust opacity, or tweak its horizontal/vertical position. You can also resize, magnify, and move the photo around the page as you see fit.
If you need to tick boxes or add different symbols to the form, tap Shapes at the bottom of the screen and choose the one you need. Tap on it and select Properties to adjust the border weight and color. You can also rotate it and move it across the page to the desired place.
To add your signature to the form, tap Sign at the bottom of the screen. In iScanner, you have several ways to do that. Tap Plus and choose one that suits you best from the list:
Once you’ve filled out the form, you can share it straight away from the app. You can email it to yourself or others, send it via any messenger, or upload it to cloud storage. Just tap the Share button at the top right and choose one of the options from the menu. That’s it!
Learning how to fill out a PDF form doesn’t have to be complicated. With iScanner, you can upload, complete, sign, and send any form—all from your phone. Whether you’re dealing with tax paperwork, school forms, or business documents, iScanner makes the process fast, secure, and seamless.
Ready to try it for yourself? Download iScanner and fill out your next PDF form in minutes—no printer, no hassle.